Современные информационные технологии/Компьютерная
инженерия
Myasischev AA
Khmelnitsky National University, Ukraine
The use of single-board mini computers and WebIOPi framework for remote access to
sensors
For decision-making, for
example in tasks control
devices we need to have information that can be obtained from sensors. The
sensors can be located at a great distance from each other and from the control
center. Therefore, to obtain access to sensors we can use Internet.
For remote access to the
sensors can be used microcontrollers
or mini computers single-board. In this
paper, to solve the problem of remote access to the sensors we will use mini
computers on single-board. Currently, the most popular are mini computers
Raspberry Pi 2, Banana Pi 2 and Orange Pi PC.
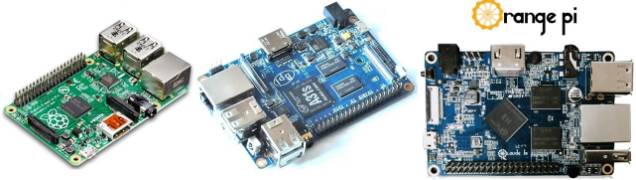
Fig.1. Single Board Computers
These computers are united:
1. Small size as a credit card;
2. Quad processor that runs on all computers with frequency 1-1.2 GHz ;
3. RAM 1 GB;
4. SD card instead of the disk to load the operating system and programs;
5. Ethernet port for network connectivity;
6. HDMI output for connecting a monitor or digital TV;
7. USB ports for connection, such as a keyboard, mouse, flash memory;
8. Linux operating system;
9. And most importantly - 40-pin GPIO port that connects devices and
sensors, which must be managed.
The main task - is the choice of computer for remote management.
1. Cost (on 02.25.2016, the site http://ru.aliexpress.com with
delivery):
- Raspberry Pi 2 - $36.99;
- Banana Pi 2 (BPI-M2 A31S) - $50.21
- Orange Pi pc - $18.99
2. Performance CPU + Memory:
For computational tests with 4 cores:
- Banana Pi 2 (BPI-M2 A31S);
- Orange Pi pc;
- Raspberry Pi 2.
When using one core for computer work (the task is not parallelized):
- Orange Pi pc;
- Banana Pi 2 (BPI-M2 A31S);
- Raspberry Pi
2.
It is noted that Orange Pi runs 3 core, 4-th does not always start.
3. Technical support and the presence of a well-functioning software:
Raspberry Pi 2 - (1); Banana Pi 2 - (2); Orange Pi pc - (3).
Orange Pi has not software for support pins of GPIO port.
For remote control sensors can be used microcontrollers:
1. Arduino Mega256 with Ethernet Shied w5100 - cost $12-15;
2. Arduino nano and network controller enc28j60 - cost $8-9;
3. ESP8266-12 - $2-3;
Experience shows that the microcontrollers well are worked in a local network, but in the global network many packets are lost,
and management become unreliable. Mini computers are running the Linux operating
system, which has got qualitative network protocols. Therefore mini computer manages sensors and devices
better than microcontroller
across the WAN. For mini computers can do a high degree of protection to access
the managed system. Microcontroller has not resources for nice protocols and
protect against hacking. Based on the above, for the remote operation of
sensors we will use minicomputer Raspberry Pi 2. As an example, is discussed to
connect the pressure gauge and temperature BMP180 to I2C bus of computer. We have to solve the tasks:
- When we are connecting to a computer using a web browser on the screen
we must to see the pressure and temperature. Their values must is being changed
every 5 seconds;
- When we click on a link of
temperature and pressure of the browser should render the graphics
temperature and pressure;
- The script on Python must do
records of pressure and temperature in the files every 5 minutes. They are used
for plotting;
- It is necessary to provide management of device in the absence of his real of IP - address
(or DNS name). You only need to connect to
the Internet, such as through a standard ADSL modem with installation of the
NAT.
We consider the sequence of solving the problem:
1. Installation Raspbian operating system.
We need to copy the image RASPBIAN
operating system with the site
https://www.raspberrypi.org/downloads/raspbian/, such as a computer running
Windows 8.1. And unzip this the file. We need to copy Disk Utility Win32DiskImager
with site http://sourceforge.net/projects/win32diskimager and is unzip it. After
this we must set the SD card to computer and install on SD card operating
system image with help of Disk Utility.
After that we set the SD card in the Raspberry Pi computer. We must connect a
monitor, keyboard, mouse and an Ethernet cable to the computer. After
connecting the power, the computer automatically loads of RASPBIAN and displays
the preset menu which is formed of file raspi-config. Options of this file is
in the link
https://www.raspberrypi.org/documentation/configuration/raspi-config.md
.
2. We must give the computer of
Raspberry Pi static IP - address.
Raspberry Pi performs the function of web - server, so it should have a
static ip address. For this:
- is changing the contents of
the file /etc/network/interfaces to
auto lo
iface lo inet
loopback
auto eth0
iface eth0 inet
static
address 172.20.0.138
netmask 255.255.0.0
gateway 172.20.200.1
dns-nameservers 8.8.8.8
dhcpcd5 completely is
removed from the system by running the command:
sudo apt-get purge
dhcpcd5
3. The next step this
is to set the framework WebIOPi.
WebIOPi Framework is
a software package specifically designed for the Raspberry Pi for remote device
management. Together with Raspberry Pi
2, he implements the Internet of Things
technology. WebIOPi package allows you to create a variety of custom
applications. WebIOPi has the following features:
- Built Web - server
implemented in Python;
- Built-In support
for more than 30 devices with interfaces UART, SPI, I2C, 1-Wire;
- Javascript /HTML
Library which uses for create of a Web-based interface;
- Python/Java libraries which uses for creating
applications for Android;
- Supports SoAP
protocol for control and interaction between ordinary electronic devices over
the network.
WebIOPi has open source,
which can be changed by the user. This allows you to increase the number of
problems to solve. To customize a package for a specific task we must change
the configuration file. In this file we
write the pins of GPIO to which are connected of devices. If the
sensors are used, they also are written in the configuration file. However it
is necessary in some cases to include a device driver (for example BMP180 sensor).
We will to install version 0.71 WebIOPi. This new version is supported
Raspberry Pi 2, which has 40 pins of GPIO port. For install WebIOPi, we must go
the computer through 22 port with help of program putty.exe (login - pi, password - raspberry) and in
the terminal to enter the following commands one by one:
$ wget
http://sourceforge.net/projects/webiopi/files/WebIOPi-0.7.1.tar.gz
$ tar xvzf
WebIOPi-0.7.1.tar.gz
$ cd WebIOPi-0.7.1
Install the patch to work with 40 GPIO Raspberry Pi 2:
$wget https://raw.githubusercontent.com/doublebind/raspi/master/webiopi-pi2bplus.patch
$ patch -p1 -i
webiopi-pi2bplus.patch
$ sudo ./setup.sh
To automatically start after reboot WebIOPi we have to execute a
command(valid for the image 2015-05-05-raspbian-wheezy.img):
sudo update-rc.d
webiopi defaults
For later versions of startup programs is performed as follows:
$ cd
/etc/systemd/system/
$ sudo wget
https://raw.githubusercontent.com/doublebind/raspi/master/webiopi.service
$ sudo systemctl
start webiopi
$ sudo systemctl
enable webiopi
Then we have to restart the Raspberry Pi 2: sudo reboot
Now we need to test the WebIOPi. From any computer on the
local network, we introduce the network address which has the Raspberry Pi 2
with the port 8000. For example: http://172.20.0.138:8000/app/gpio-header
For access to WebIOPi we have to
enter your login and password. Default login is «webiopi», password -
«raspberry». The browser will display WebIOPi interface, which to show all 40 pins of port GPIO and their destination. To change the login and password, we
must enter the command:
sudo webiopi-passwd
For settings of WebIOPi
under task we have to sensor
pressure and temperature BMP180
register in the configuration file /etc/webiopi/config in section [DEVICES]:
bmp = BMP085
Figure 2 shows a wiring diagram of the sensor to pins of GPIO.
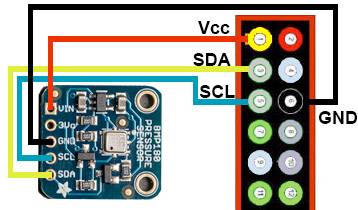
Fig.2. Connecting sensor BMP180 to the GPIO
In file /boot/config.txt we need to add a line: dtparam=i2c_arm=on
To change the password Webiopi we must enter the command:
$ sudo webiopi-passwd
Then we must restart the
computer with help reboot command. To check the temperature sensor we need to connect to the address:
http://172.20.0.138:8000/app/devices-monitor
In browser, we should see
temperature and pressure on the sensor (Figure 3).
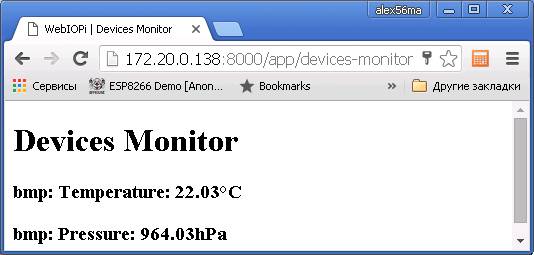
Figure 3. The data is from the
sensor BMP180
For overload WebIOPi after making changes to the configuration file, the
Python script and an html file, you need to: /etc/init.d/webiopi restart
Error messages when you start Webiopi are in the file /var/log/webiopi. It can be printed on command: cat
/var/log/webiopi
4. Creating file index.html and script on Python script.py
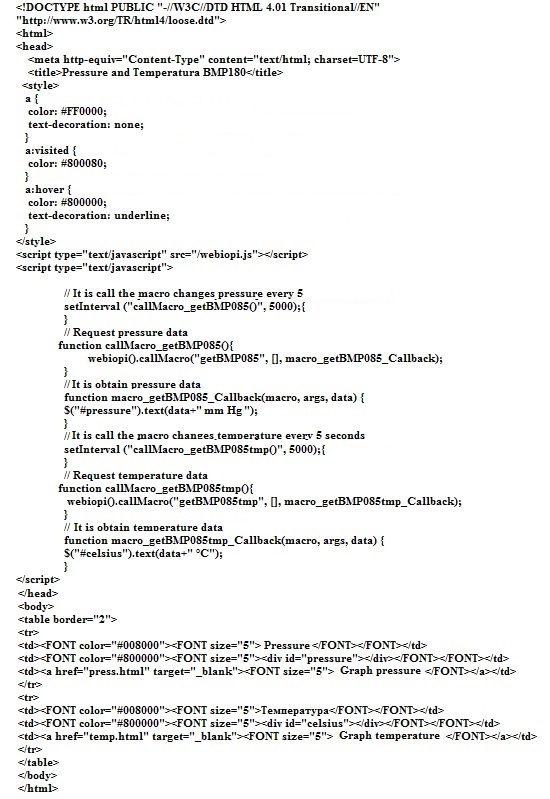
Figure 4. The index.html file
The need for these files
is as follows. HTML-page via JavaScript makes the request to the script (the
program), which written in Python. Python script returns the HTML-page the data, which obtained from
the sensor BMP180 for their visualization. Every 5 minutes script records data about pressure and temperature in the text file. This
file is used to build pressure and temperature graphs for the changing time. The
contents of index.html shows in figure
4. It is in directory /home/pi/myproject/html . The content of file script.py
on the Python shows on figure 5. It is
written in directory of /home/pi/myproject/python
The file press.html shows
in Fig. 6. Similarly looks temp.html file to generate a temperature graph.
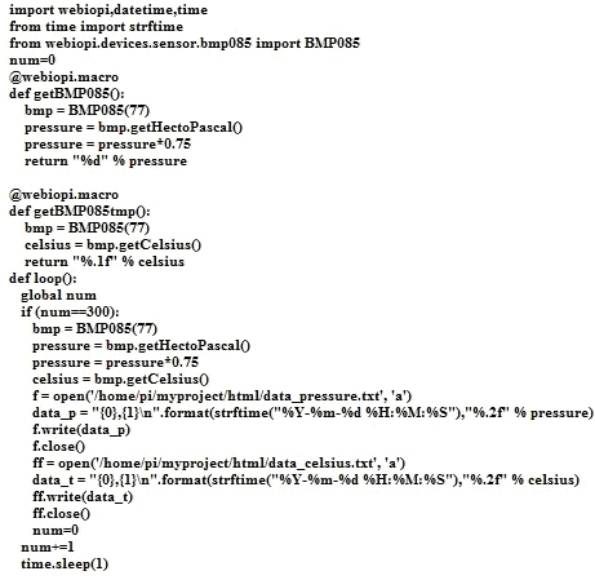
Figure 5. File script.py
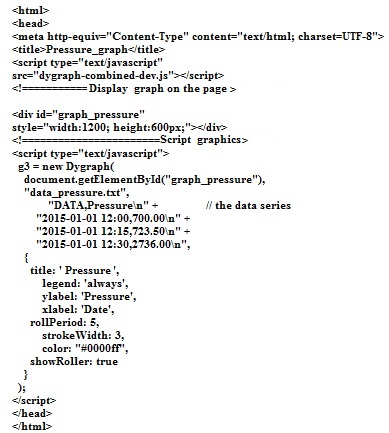
Figure 6. The file press.html
for generate graph of pressure
For build graphs of
pressure and temperature are used HTML
files press.html and temp.html. These files use library the dygraph, which is written on the JavaScript. The file
dygraph-combined-dev.js the library is
copied from the site
http://dygraphs.com to directory /home/pi/myproject/html. After
restarting the computer WebIOPi will work on the presented scripts. If you
connect to it via a browser, information about pressure and temperature will be presented as shown in Figure 7.
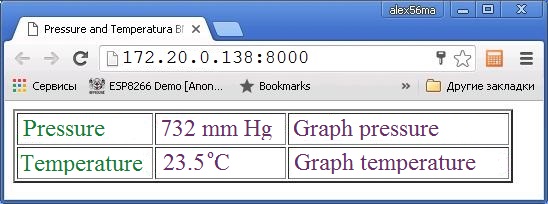
Figure 7. Data from the sensor BMP180
If you click on the link "Graph pressure", in a new browser
window will show a graph of pressure, similar to Figure 8.
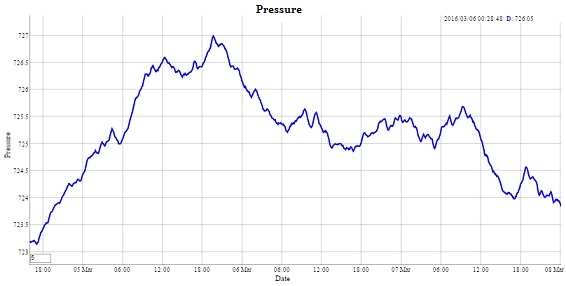
Figure 8. Graph pressure is generated with help library dygraph
5. Connecting to the Internet of
computer Raspberry Pi 2, if it has not
got real ip-address or domain name, but
has access to the Internet (via a modem, the router, firewall).
One way to get access to the Raspberry Pi as a device to the Internet of
Things is the use Weaved service. It offers the following services:
- SSH - you can login in the Raspberry Pi from anywhere in the world via
SSH;
- Web (http) on port 80 - you can view web - pages from anywhere in the
world, located on the Raspberry Pi;
- WebIOPI - allows you to manage
by pins GPIO Raspberry Pi, using software developed by the user.
Before installing the Weave you must to create the directory
/home/pi/myproject/my, enter there and
work there with Weaved files.
Installing Weaved on
Raspberry Pi:
- You should get account on the
site https://developer.weaved.com/portal/login.php;
- The Raspberry Pi 2 connect to
the Internet;
- The Weaved Software download
on the Raspberry Pi:
wget
https://github.com/weaved/installer/raw/master/binaries/weaved-nixinstaller_1.2.13.bin
- File weave-nix installer v1.2.13.bin make executable:
chmod +x weaved-nixinstaller_1.2.13.bin
- Run the installation program:
./weaved-nixinstaller_1.2.13.bin
- Choose a service.
The first time you will be prompted to install one of the service:
SSH on port 22, Web (HTTP) on port 80, WebIOPi on port 8000, VNC on port
5091 (tested with tightvncserver), or a custom TCP on the selected port.
Select here the third service, Web (HTTP) in the 8000-th port.
- Enter your login information in the Weave (enter the account, which
was received at Weaved site).
- Next, enter the name of your device, for example webiopi80.
- You must check, that was created a new device:
We go at https://developer.weaved.com/portal/login.php and enter your
account.
After entering the next page (Fig. 9) should appear the name of the
created device:
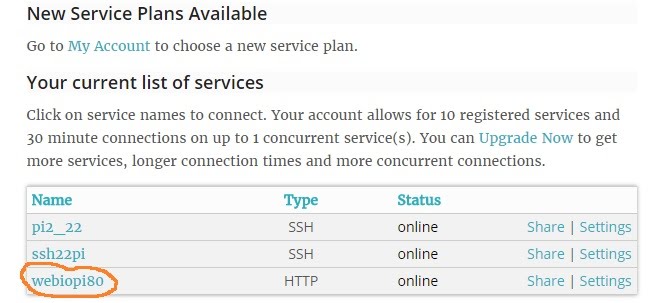
Figure
9. Listing created services
Conclusions.
1.Reliable remote control the sensors (equipments) with the help of mini
computers via the Internet, compared with microcontrollers. On
the microcontrollers the network protocols is lightweight, so do not work
reliably.
2.The high cost of control systems on mini computers over the network
compared to microcontrollers.
3.Thanks to software WeBIOPi we
can simply program the mini computers that we use for remote management.
4. We are able to obtain access to the mini computers via the Internet in
the event of inability to use the real IP - address and of the domain name. This is possible with the help of service Weaved.
5.The problem has a software module BMP085 when work with the pressure sensor BMP180. After a few hours of
work is no longer work Web - WebIOPi server. Instead of is to work with the
module BMP085:
from webiopi.devices.sensor.bmp085 import BMP085
bmp = BMP085()
better use module deviceInstance:
from webiopi import deviceInstance
bmp = webiopi.deviceInstance("bmp")
Here ("bmp") - is to get a device named bmp, which is in the
file /etc/webiopi/config, in the section [DEVICES].
6. Mini computers can not only receive data from the sensors, but and
process them.
Example - is plotting changes of values from the sensors.
Literature.
1. WebIOPi - The Raspberry Pi Internet of Things Framework. [Electronic
resource]. - Mode of access:
http://webiopi.trouch.com/, 2016.
2. Internet of Things for Everyone. [Electronic resource]. - Mode of access: https://www.weaved.com/ ,
2016.
3. Комплексная система
домашней автоматизации на Raspberry Pi. [Electronic
resource]. - Mode of access:
http://electromost.com/ , 2014.
4. Мясищев А.А. Интернет электро - розетка на основе
мини компьютера Raspberry Pi и фреймворка WebIOPi. Практика для студентов. [Electronic resource]. - Mode
of access: https://sites.google.com/site/webstm32/internet_rozetka, 2016.