Современные информационные
технологии/Компьютерная инженерия
Myasischev AA
Khmelnitsky National University, Ukraine
COMPUTING CAPABILITIES STM32F4DISCOVERY, INPUT - OUTPUT IN UART WITH
SCANF AND PRINTF
Creation of autonomous vehicles (robots) requires the solution of problems of computer vision. Classical problem in computer vision is determined whether the video contains some distinctive feature. Solving such problems associated with the need for computational operations in real time. Usually used for this purpose the computing systems, which are outside the robot. Therefore, the robot is not fully autonomous. Currently, there were powerful 32 - bit microcontrollers that have built-in co-processors to perform operations with real numbers. For a simple example we estimate the computational power microcontroller STM32F407VGT6, which is installed on board STM32F4Discovery Company STMicroelectronics [1]. The objective is to calculate the integral by rectangles. In drawing up the program, consider programming USART the microcontroller using the standard features of the C language - printf and scanf for a software package IAR Embedded Workbench for ARM. To work with the board STM32F4Discovery used software package IAR Embedded Workbench for ARM [2]. It comes with a license that allows you to try the integrated development environment, and assess its efficiency and ease of use.Two variants evaluation license:1. Limited License to 30 days, but fully functional.2. Restrictions on the size of the code 32KByte License Kickstart, but that works without limitation in time. The second license can be used for a wide range of simple tasks, which belongs to a program considered here.Software package IAR Embedded Workbench for ARM is copied from the site http://supp.iar.com/Download/SW/?item=EWARM-EVAL. It is installed when you run the executable file. To connect STM32F4Discovery to the computer's USB port for programming the microcontroller is used ST-LINK/V2 USB driver for Windows [2]. Need STM32F4DISCOVERY board firmware package, including 22 examples (STSW-STM32068) [2]. The copied file is decompressed in the working directory.
In the source [2] presents the program that calculates the definite integral, equal to the number pi:
According to the rule is represented by rectangles integral sum of the areas of elementary rectangles:

Below is part of the program to calculate the area of a curvilinear trapezoid:
printf("\r\nInput:\r\n");
scanf("%i",&n); // Enter the number of rectangles
(100000)
printf("\r\nStart\r\n");
dx = 1.0f/n; // 1.0f
- 1.0 – single-precision real number
for( j=1;j<=200;j++) {
// 200 times the integral counting method of rectangles
sum = 0.0f; for( i = 1;i<=n; i++){
xi = (i - 0.5f ) * dx; yi = 4.0f/(1.0f + xi * xi); sum = sum +
dx*yi;
} }
printf("pi=%.16f\r\n",sum);
// Displays the number pi
} }
To redirect the output of printf to USART you need to add the function __write out the file write.c, which is located in the directory of IAR Embedded Workbench for ARM:C:\Program Files\IAR Systems\Embedded Workbench 6.5\arm\src\lib\write.c.__write uses the MyLowLevelPutchar to send byte of UART. Below is a piece of software with these features:
size_t __write(int handle,
const unsigned char * buffer, size_t size)
{
size_t nChars = 0;
if (buffer == 0)
{ return 0;
}
if (handle !=
_LLIO_STDOUT && handle != _LLIO_STDERR)
{ return
_LLIO_ERROR; }
for (/* Empty */; size != 0; --size)
{ if (MyLowLevelPutchar(*buffer++) <
0)
{ return
_LLIO_ERROR; } ++nChars; }
return nChars;
}
// the transfer function via UART bytes
int MyLowLevelPutchar(int x){ while(USART_GetFlagStatus(USART3, USART_FLAG_TXE) == RESET); USART_SendData(USART3, x); return x; } Similarly to redirect input on scanf with USART is added function __ read from the file:C:\Program Files\IAR Systems\Embedded Workbench 6.5\arm\src\lib\read.cIt is used with the function MyLowLevelGetchar to obtain a byte from USART. In work USART3 used for receiving and transmitting data from the microcontroller to the COM port of the computer. The following excerpt from the program (function usart_init ()) for setting USART3:
void usart_init(void)
{ // Declare
two structures to store the settings and GPIOC USART3.
GPIO_InitTypeDef
GPIO_InitStructure;
USART_InitTypeDef
USART_InitStructure;
// Enable
clock port C, and UART3
RCC_AHB1PeriphClockCmd(RCC_AHB1Periph_GPIOC,
ENABLE);
RCC_APB1PeriphClockCmd(RCC_APB1Periph_USART3,
ENABLE);
// Connect the 10th pin GPIOC to USART3 to transmit (Tx)
GPIO_PinAFConfig(GPIOC,
GPIO_PinSource10, GPIO_AF_USART3);
// Connect the 11th pin GPIOC to USART3 to receive (Rx)
GPIO_PinAFConfig(GPIOC,
GPIO_PinSource11, GPIO_AF_USART3);
// Configure 10 and 11 pins GPIOC for to work with USART3
GPIO_InitStructure.GPIO_OType = GPIO_OType_PP;
GPIO_InitStructure.GPIO_PuPd = GPIO_PuPd_UP;
GPIO_InitStructure.GPIO_Mode = GPIO_Mode_AF;
GPIO_InitStructure.GPIO_Pin = GPIO_Pin_10
| GPIO_Pin_11;
GPIO_InitStructure.GPIO_Speed = GPIO_Speed_100MHz;
GPIO_Init(GPIOC,
&GPIO_InitStructure);
// Set the parameters of the USART3
USART_InitStructure.USART_BaudRate
= 9600; // The speed USART_InitStructure.USART_WordLength =
USART_WordLength_8b;
USART_InitStructure.USART_StopBits
= USART_StopBits_1; USART_InitStructure.USART_Parity =
USART_Parity_No;
USART_InitStructure.USART_HardwareFlowControl
=
USART_HardwareFlowControl_None;
// Enable receiver and transmitter
USART_InitStructure.USART_Mode
= USART_Mode_Rx | USART_Mode_Tx;
// Save settings USART3
USART_Init(USART3, &USART_InitStructure);// Enable USART3
USART_Cmd(USART3, ENABLE); Figure 1 shows the connection STM32F4Discovery (USART3) to a PC via USART - USB converter. There programmer AVR ISP v3.2 [2] is used as a converter.
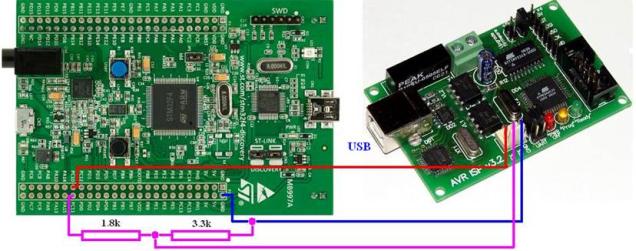
Fig.1. Scheme of connections
On the computer was
started HyperTerminal (Figure 2) and were performed experimental calculations.
The calculations were performed:
1. With a maximum optimization and without optimization;
2. With co-processor (FPU) and without a coprocessor;
3. For single and double precision;
4. In the development environments IAR Embedded Workbench for ARM
ver. 6.70 and CooCox ver. 1.7.5.
This paper presents the
comparison with the processor AMD Phenom II X6 1090T (3.2GHz) for which the
task was run on a single core. The results are shown in Table 1. Time
calculations are shown in seconds.
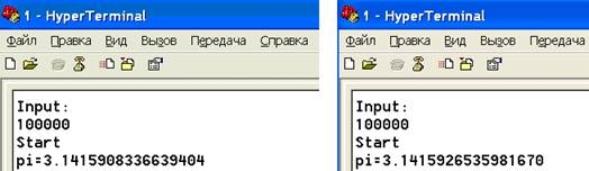
Fig.2. An example work of the program
for single and double precision (pi = 3.141592653589793238...)
Table 1.
|
|
IAR Embedded Workbench for ARM STM32F407VGT6 (168MGh) |
CooCox ver. 1.7.5. STM32F407VGT6 (168MGh) |
AMD Phenom II X6 1090T (3.2GHz), Linux Ubuntu, gcc. |
|||||||
|
Without optimiz. |
With optimiz. |
Without optimiz. +FPU |
With optimiz. +FPU |
Without optimiz. |
With optimiz. |
Without optimiz. +FPU |
With optimiz. +FPU |
Without optimiz +FPU. |
With optimiz. +FPU |
|
|
Single precision |
35s |
35s |
4s |
4s |
58s |
55s |
7s |
4s |
0.19s |
0.11s |
|
Double precision |
- |
65s |
- |
82s |
- |
155s |
- |
153s |
- |
- |
Conclusions.
1. To perform the calculations necessary to give preference to the
environment IAR Embedded Workbench for ARM.
2. Coprocessor microcontroller STM32F407VGT6 works only for real numbers
with single precision (4 bytes).
3. If the operating frequency of the microcontroller is equal to the
frequency of the processor AMD, their performance will be almost equal. The gcc
compiler AMD of processor does not have
to be started with a key optimization.
Literature.
1. STM32F4DISCOVERY.
Discovery kit with STM32F407VG MCU. [Electronic
resource]. - Mode of access: http://www.st.com/web/catalog/tools/FM116/SC959/SS1532/PF252419,
2013.
2. Мясищев А.А. Вычислительные
возможности STM32. Практика для студентов. [Electronic
resource]. - Mode of access:
https://sites.google.com/site/webstm32/stm32_1. 2014.